サウンド関連メモ
HALion関連
データをインポートする際のチェックボックスについて
まずはそのスクリーンショット。
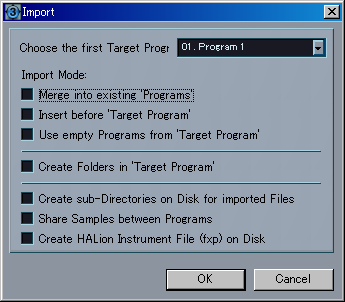
Import Mode
| Merge into existing Programs |
If this is checked, the samples in the imported Program will be merged into the existing Program, and the existing Program will keep its name. If this option is unchecked, the imported Program replaces the current Program.
選択したスロットにデータをマージする。
|
01. AAA └ AAA Data 02. BBB └ BBB Data 03. Program 3 ↓ 01. AAA ├ AAA Data └ New #1 Data 02. BBB ├ BBB Data └ New #2 Data 03. Program3 |
| Insert at target Program |
This will place the samples in the selected first target Program slot. 指定のスロットにあるプログラムが下のスロットにずれ、その空いたスロットにデータをアサインする。
|
01. AAA 02. BBB 03. Program 3 ↓ 01. AAA 02. BBB 03. New Program 1 04. New Program 2 05. Program 3 |
| Use empty Programs from target Program |
If several .fxp files have been selected, the first Program will be inserted at the selected first target Program and the following Programs will be inserted into the next empty Program slot(s) following the target program. 選択したプログラムより下の空いているスロットに順番にアサインする (マニュアルの記述内容は違うっぽい?)。 |
01. AAA 02. BBB 03. Program 3 04. Program 4 05. Program 5 ↓ 01. New Program 1 02. New Program 2 03. AAA 04. BBB 05. Program 5 |
| ノーチェック | 指定したプログラムのスロットから順番にプログラムを上書きする。 |
01. AAA 02. BBB 03. Program 3 ↓ 01. New Program 1 02. New Program 2 03. Program3 |
オプション
| Create folders in target Program |
This will create a new folder for the imported Programs/samples inside the currently selected Program folder.
選択したプログラムの下にデータを追加する。 |
01. AAA 02. BBB 03. Program 3 ↓ 01. AAA ├ New Program 1 └ New Program 2 02. BBB 03. Program3 |
残りの選択項目の内容は以下の通り。
| A. Create sub-directories for imported files |
This will create a subfolder structure on your hard-disk that (意訳) プログラムごとのサブフォルダを作成する。 |
| B. Share samples between Programs |
If this is checked, the samples will only be imported once to
your (意訳) プログラムごとのサブフォルダは作成しない。Aよりも優先されるっぽい? |
| C. Create Halion Instrument file |
This will create a HALion Instrument file for all imported
files. (意訳) fxpファイルを作成する。 |
試してみたところ、次の結果に。
| A | B | C | Result | Explorer |
|---|---|---|---|---|
| x | プログラム名のフォルダを作成し、その中にWAVファイルを作成 |
[Parent Folder] ├ [New Program 1] │ └ New Program 1.wav └ [New Program 2] └ New Program 2.wav |
||
| x | x | 指定のフォルダ内にWAVファイルを作成 |
[Parent Folder]
├ New Program 1.wav └ New Program 2.wav |
|
| x | x | プログラム名のフォルダを作成し、その中にfxpファイルとWAVファイルを作成 |
[Parent Folder] ├ [New Program 1] │├ New Program 1.fxp │└ New Program 1.wav └ [New Program 2] ├ New Program 2.fxp └ New Program 2.wav |
|
| x | x | x | 指定のフォルダにfxpファイルとWAVファイルを作成 |
[Parent Folder] ├ New Program 1.fxp ├ New Program 1.wav ├ New Program 2.fxp └ New Program 2.wav |
| x | 指定のフォルダ内にWAVファイルを作成 |
[Parent Folder]
├ New Program 1.wav └ New Program 2.wav |
||
| x | x | 指定のフォルダ内にWAVファイルを作成し、指定のフォルダと同じ階層にfxpファイルを作成 |
[Parent Folder] ├ New Program 1.wav └ New Program 2.wav New Program 1.fxp New Program 2.fxp |
|
| x | 指定のフォルダにfxpファイルとWAVファイルを作成 |
[Parent Folder] ├ New Program 1.fxp ├ New Program 1.wav ├ New Program 2.fxp └ New Program 2.wav |
||
| 指定のフォルダ内にWAVファイルを作成 |
[Parent Folder] ├ New Program 1.wav └ New Program 2.wav |
CubaseSX関連
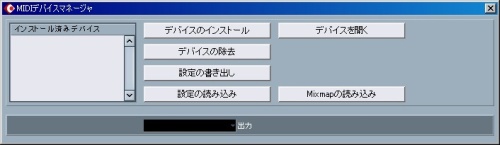
MIDIデバイスマネージャ
OS再インストール後の設定で(2年に1回くらいのペースのため)毎回手順を忘れてしまうので、メモ。まずこの設定をしてMIDIまわりの環境を整えます。
設定ファイル(XMLフォーマット)がある場合
「デバイス」メニューのMIDIデバイスマネージャを起動。、「設定の読み込み」ボタンをクリックし、設定内容が保存されたXMLファイルを指定。
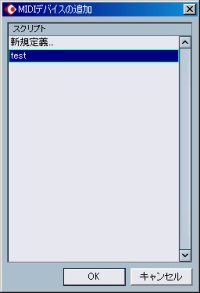
※初回起動後は当然インストール済みデバイスはなし。
「MIDIデバイスの追加」ダイアログが表示される(XMLファイルに保存されているデバイスが一覧表示されている)ので、該当するデバイスのスクリプトを選択し、OKをクリック。
デバイス(ここでは「test」)が「インストール済みデバイス」に追加されているのを確認(ここでは出力が未接続になっているが、「設定の書き出し」時に設定していればその設定内容も反映される)。
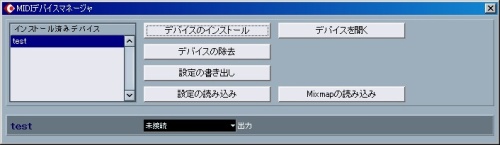
後は、読み込みたいデバイスについてこの手順を繰り返す。
設定ファイル(XMLフォーマット)がなく、スクリプトがある場合
「C:\Documents and Settings\[ユーザ名]\Application Data\Steinberg\Cubase SX 3\Scripts\Patchnames」
というフォルダを作り、その中に以下のような設定内容を記述したをスクリプトを入れる。
[cubase parse file]
[parser version 0001]

[creators first name]Steinberg Soft- und Hard GmbH
[creators last name]Steinberg Soft- und Hard GmbH
[device manufacturer]KORG
[device name]TRINITY plus
[script name]KORG TRINITY plus
[script version]version 1.02

[define patchnames]

[mode]	TRINITY Programs
[g1]		Bank A
[p2, 0, 0, 0]	0.Acoustic Piano
[p2, 1, 0, 0]	1.*Tingly* E.Piano
	:
※当時私は機材分のスクリプトを数日かけてひたすら入力しました
「デバイス」メニューのMIDIデバイスマネージャを起動。「デバイスのインストール」をクリックする。
スクリプトが正しくフォルダに置かれていると、デバイスの名前が表示されるので選択。
デバイス(ここでは「test」)が「インストール済みデバイス」に追加されているのを確認。後は「出力」のところを出力先のMIDIポートに設定して終了。複数機器がある場合は同様に追加し、最後に「設定の書き出し」でXMLファイルとして設定情報を出力しておくと、数年後のインストール作業が楽になります。